Silhouette Cut Settings For Reflective Vinyl

Vinyl Settings Silhouette Cameo Vinyl Silhouette Cameo Tutorials Silhouette Cameo Crafts

Machine Settings Silhouette Cameo Vinyl Silhouette Cameo Tutorials Silhouette Cameo

Machine Settings Silhouette Cameo Silhouette Vinyl Silhouette Cameo Tutorials

Cricut Settings For Vinyl Silhouette Cameo Crafts Silhouette Cameo Beginner Silhouette Cameo Tutorials

Machine Settings Silhouette Cameo Vinyl Silhouette Cameo Tutorials Silhouette Cameo

Perfect Settings For Silhouette Cameo In 2020 Silhouette Cameo Vinyl Silhouette Cameo Crafts Silhouette Cameo Projects Vinyl

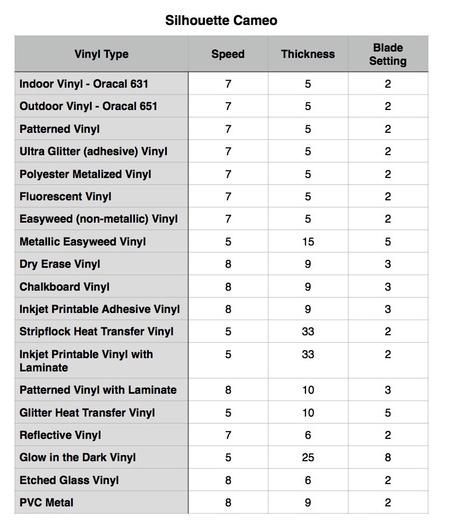
Vinyl matte blade 1 speed 5 force 10 blade 3 speed 3 pressure 2.
Silhouette cut settings for reflective vinyl.

Machine Settings Silhouette Cameo Crafts Silhouette Cameo Tutorials Silhouette Cameo Projects

Machine Settings Expressions Vinyl Cricut Projects Vinyl Silhouette Cameo Tutorials

Silhouette Cameo Cricut Settings Expressions Vinyl Expressions Vinyl Cricut Projects Vinyl Silhouette Cameo Tutorials

Machine Settings Cricut Vinyl Cricut Cricut Expression

Machine Settings Expressions Vinyl Silhouette Cameo Projects Vinyl Silhouette Cameo Vinyl

Machine Settings Silhouette Cameo Vinyl Silhouette Cameo Beginner Silhouette Cameo Tutorials

Machine Settings Expressions Vinyl Cricut Heat Transfer Vinyl Cricut

Silhouette Cameo Settings Silhouette Diy Silhouette Cameo Vinyl Silhouette Cameo

Silhouette Blade Settings For Vinyl Jpg Silhouette Cameo Vinyl Silhouette Cameo Crafts Silhouette Cameo Projects Vinyl

Pin On Vinyl Tips

Machine Settings Expressions Vinyl Cricut Heat Transfer Vinyl Cricut

Machine Settings Expressions Vinyl Cricut Iron On Vinyl Cricut
Https I Pinimg Com Originals 6e 81 4f 6e814ffdc5f044ba03925a5d97876a29 Jpg With Images Silhouette Cameo Software Oracle Vinyl Vinyl

Machine Settings Cricut Projects Vinyl Expressions Vinyl Cricut Projects Beginner

Pin On Svg

Pin On Silhouette

Machine Settings In 2020 Expressions Vinyl Cricut Projects Vinyl Cricut Vinyl

3m Silver White Reflective Vinyl For Cricut Silhouette Cameo 3 X 12 6 Pieces Diy Decals Cricut Vinyl Reflective Vinyl Gifts
Https Encrypted Tbn0 Gstatic Com Images Q Tbn 3aand9gcrouzlc4ab4p Wg5uqyhxxa32row7znqirffsjiishuyjzp2v18 Usqp Cau
Pin On Cricut Tutorials

Pin By Jamie Lance On Silouette Silhouette Cameo Tutorials Silhouette Cameo Crafts Silhouette Vinyl

Pin By Marissa Oliva Dominguez On Crafts Silhouette Design Silhouette Cameo Vinyl Silhouette Cameo Crafts Silhouette Cameo Projects Vinyl

A Great Resource For Paper Crafters With Loads Of Tips And Tricks For Making Cards Silhouette Cameo Vinyl Silhouette Cameo Crafts Silhouette Cameo Tutorials

Blade Settings Silhouette Cameo Software Chalkboard Vinyl Oracal Vinyl
Source : pinterest.com
